

How To Draw Cervical Curve On Xray
- This is a line fatigued on a lateral radiograph of the skull or on a sagittal cut from a CT or MRI browse that connects the posterior and anterior aspects of the foramen magnum.
- The tip of the dens (or odontoid procedure) should be ~5 mm below this line.
- Note: If the tip of the dens is eroded then the Redlund-Johnell and modified Ranawat methods (normal CT values for men is > 23.7 mm and for women is > 24.2 mm) can be used instead.
- This is a line drawn from the posterior surface of the hard palate to the tip of the opisthion (posterior attribute of the foramen magnum) and is used to measure out the distance of how much the odontoid tip extends above this line.
- If the tip of the dens extends > 3 mm above this line and then it helps to recognize the presence of basilar invagination (a craniocervical junction abnormality where the tip of the dens projection upwardly into the foramen magnum).
- Note: When the opisthion (posterior aspect of the foramen magnum) cannot be identified on a plain radiograph use the McGregor line. Draw a line from the posterior edge of the difficult palate to the caudal end of the occipital bend. The tip of the dens should lie less than 4.5 cm higher up this line.
- This is a line drawn from the caudal extension of the dorsal surface of the clivus and is used to measure the distance of infinite to the tip of the dens (or odontoid process).
- Make certain you can see all 7 cervical barbed process
- Make sure pre-vertebral soft tissue is < vii mm in thickness in front end of C2 (or < l% of the width of C2 vertebral body) and < 22 mm in front of C6 (or no more width of C6 vertebral body
- Evaluate the orientation of the epiglottis, hyoid bone, tracheal shadow and cheque for any foreign bodies
- Cheque the inductive vertebral line (anterior longitudinal ligament line)
- Check the posterior vertebral line (posterior longitudinal ligament line)
- Check the spinolaminal line
- Check the spinous process line Inspect each vertebral body, pedicle, lamina and spinous procedure from C1 - C7
- Clivus should be pointing toward the odontoid (the clivus lies at the base of the skull is made from the surface of the occipital and sphenoid bones)
- Check that the intervertebral spaces are compatible at each level
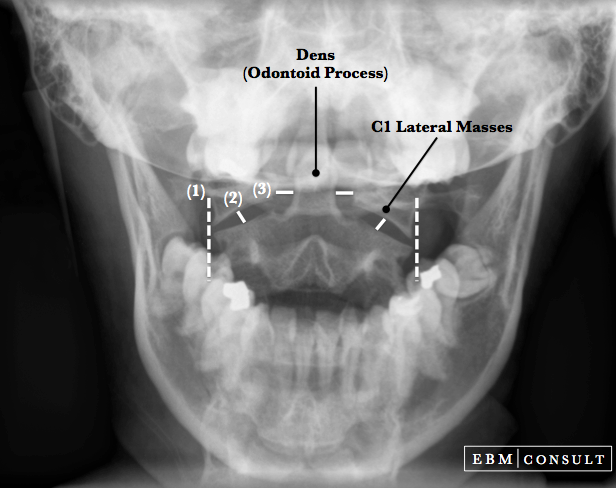
- Make sure the atlantodens interval (ADI; or pre-dental space) is < three mm in adults or < 5 mm in children
- Make sure the basion-dens space is < 12 mm
- Make sure the C2 ring is smooth and continuous and that C2 does not appear "fat" (i.eastward., vertebral body that is wider than C3)
- Scan the mandible and base of the skull
- Kwong Y et al. AJR Am J Roentgenol 2022;196(4):W421-5. PubMed
- Cronin CG et al. Clin Radiol 2009;64(1):64-9. PubMed
- Anthony J. Busti, MD, PharmD, FNLA, FAHA
- Dylan Kellogg, Doc
Basic Beefcake & Lines
Note: Scroll over or tap on image to see labels & lines.

Notation: Gyre over or tap on image to encounter labels & lines.
Core Radiographic Lines
Note: Scroll over or tap on the image to see labels & lines

Note: Gyre over or tap on the image to run into labels & lines
McRae Line:
Chamberlain Line:
Wackenheim Line:
How to Read Lateral C-Spine Ten-ray
When reading any radiograph the clinician should institute a process or guild they follow each fourth dimension. While in no particular social club, consider evaluating the following:
Related Content
To view related content click on an item below:
Open up Rima oris View C1 Fractures C2 Fracture
References
Editors & Reviewers
Editors:
Terminal Updated: August 2022

Source: https://www.ebmconsult.com/articles/how-to-read-lateral-cervical-spine-radiograph-xray
Posted by: mooreheadsoread.blogspot.com
0 Response to "How To Draw Cervical Curve On Xray"
Post a Comment